Skip to content
Home
Why Louisa
Relationship intelligence
Louisa AI Difference
Compare vendors
Platform
Products
Services
Pricing
Industries
Investment Banking
Private Capital
Venture Capital
Consulting
Startups
Alumni
Resources
About us
Insights
Press
Announcements
Careers
Home
Why Louisa
Relationship intelligence
Louisa AI Difference
Compare vendors
Platform
Products
Services
Pricing
Industries
Investment Banking
Private Capital
Venture Capital
Consulting
Startups
Alumni
Resources
About us
Insights
Press
Announcements
Careers
Home
Why Louisa
Relationship intelligence
Louisa AI Difference
Compare vendors
Platform
Products
Services
Pricing
Industries
Investment Banking
Private Capital
Venture Capital
Consulting
Startups
Alumni
Resources
About us
Insights
Press
Announcements
Careers
Home
Why Louisa
Relationship intelligence
Louisa AI Difference
Compare vendors
Platform
Products
Services
Pricing
Industries
Investment Banking
Private Capital
Venture Capital
Consulting
Startups
Alumni
Resources
About us
Insights
Press
Announcements
Careers
Book a Demo
Map Your Relationships through email communications
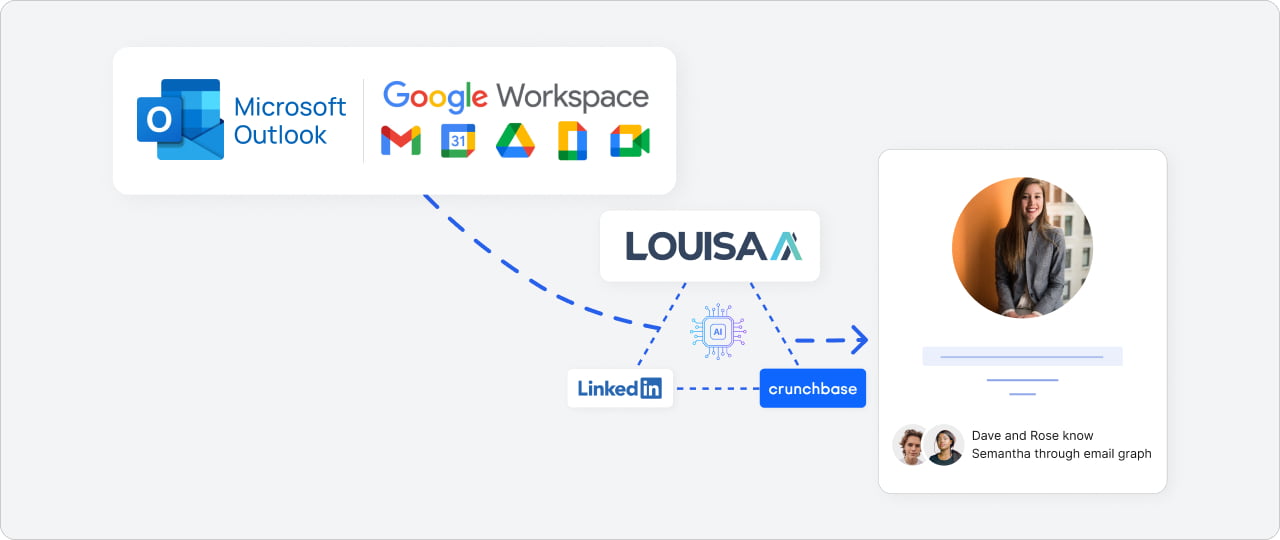
Leverage your firms relationship graph based on firms email communication
Select your firm's email system
Microsoft 365
Google Workspace
Microsoft 365
Google Workspace
Company name
Domain address
Tenant ID
Client ID
Group ID
Client secret key
Send
Steps to Setup Application on Azure Portal
Log in
to your Azure Portal.
Navigate to
Azure Active Directory > App registrations > New registration
.
Enter a name for your application, specify who can use the application, and then select
Register
.
Under
Manage
, go to
API permissions > Add a permission.
Select Microsoft Graph, add required permissions, and then click
Add permissions
.
To grant admin consent for the permissions, click on
Grant admin consent
.
Go to
Certificates & secrets > New client secret
. Add a description and expiry for the secret and click Add.
Copy the
Application (client) ID, Directory (tenant) ID
, and
Client Secret Value
for later use.
Company name
Admin email Id
Group ID
Service account JSON key file
Send
Steps to Setup Service Account from GCP
Access the
Google Cloud Platform Console.
Navigate to
IAM & Admin > Service
accounts and click
Create service account.
Fill out the
service account details
and click
Create and continue.
Assign the required role
to the service account and click
Continue
.
Click on Done to finish creating the service account.
Go to the newly created service account and click on Keys.
Click on A
dd Key > Create new key
. Choose
JSON as the key type and click Create.
Securely store the
downloaded JSON file
which contains your service account credentials.
Grant Delegated Access:
To enable the service account to act on behalf of users with specific scopes and permissions:
Login to Google Admin Console
Navigate to Security -> Access and Data Control -> API Controls -> Domain wide Delegation
Click on Add new -> Add ClientId (UniqueId of the Service Account)
Specify the below scopes and permissions for the service account.
https://www.googleapis.com/auth/gmail.metadata
https://www.googleapis.com/auth/admin.directory.group.readonly
https://www.googleapis.com/auth/admin.directory.user.readonly
https://www.googleapis.com/auth/admin.directory.user.security
Microsoft 365
Company name
Domain address
Tenant ID
Client ID
Group ID
Client secret key
Send
Steps to Setup Application on Azure Portal
Log in
to your Azure Portal.
Navigate to
Azure Active Directory > App registrations > New registration
.
Enter a name for your application, specify who can use the application, and then select
Register
.
Under
Manage
, go to
API permissions > Add a permission.
Select Microsoft Graph, add required permissions, and then click
Add permissions
.
To grant admin consent for the permissions, click on
Grant admin consent
.
Go to
Certificates & secrets > New client secret
. Add a description and expiry for the secret and click Add.
Copy the
Application (client) ID, Directory (tenant) ID
, and
Client Secret Value
for later use.
Google Workspace
Company name
Admin email Id
Group ID
Service account JSON key file
Send
Steps to Setup Service Account from GCP
Access the
Google Cloud Platform Console.
Navigate to
IAM & Admin > Service
accounts and click
Create service account.
Fill out the
service account details
and click
Create and continue.
Assign the required role
to the service account and click
Continue
.
Click on Done to finish creating the service account.
Go to the newly created service account and click on Keys.
Click on A
dd Key > Create new key
. Choose
JSON as the key type and click Create.
Securely store the
downloaded JSON file
which contains your service account credentials.
Grant Delegated Access:
To enable the service account to act on behalf of users with specific scopes and permissions:
Login to Google Admin Console
Navigate to Security -> Access and Data Control -> API Controls -> Domain wide Delegation
Click on Add new -> Add ClientId (UniqueId of the Service Account)
Specify the below scopes and permissions for the service account.
https://www.googleapis.com/auth/gmail.metadata
https://www.googleapis.com/auth/admin.directory.group.readonly
https://www.googleapis.com/auth/admin.directory.user.readonly
https://www.googleapis.com/auth/admin.directory.user.security
Join the Network Revolution
Book a 15 min demo
Full name
Email
Company
Book a demo
Close
Follow us at
Linkedin
Twitter
Youtube